In the last post I described a simple setup to manually run two instances of the same server to keep the website available even if one of them fails. Now I have tried the same with Kubernetes. For Kubernetes many of these things are provided out of the box, which makes the setup partially simpler but it seems to require more RAM on the nodes.
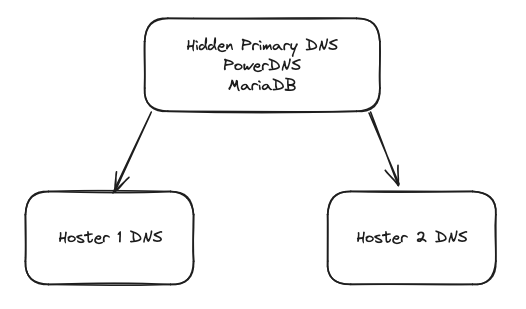
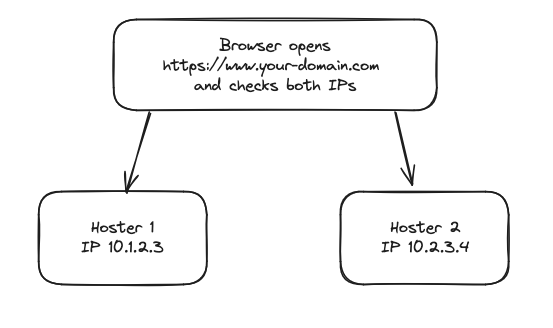
What we want is a webserver with a storage to save user uploaded files and a database:

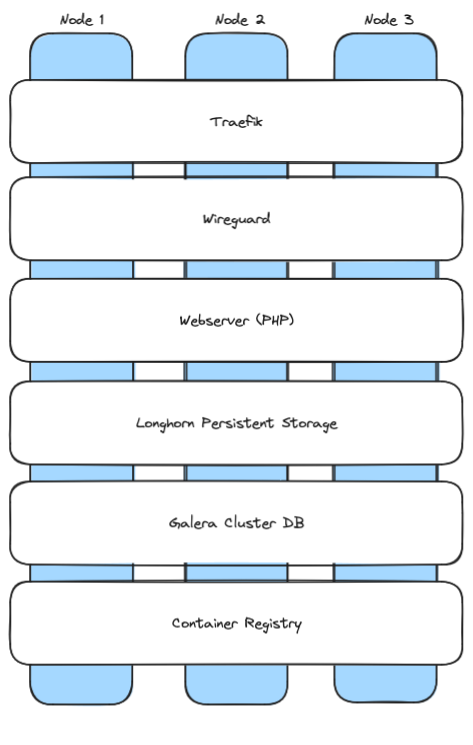
But it should be highly available, i.e. distributed over multiple servers so that it continues to run even if one of them fails. With Kubernetes it will look like this:
Now let’s install this step by step:
Linux
We need three Linux nodes with Debian or Ubuntu. They should have 4GB RAM or more (it might work with 2GB RAM but then there won’t be much RAM left for your applications). And we need to install wireguard and open-iscsi:
apt-get update
apt install -y wireguard open-iscsi
systemctl enable iscsid
systemctl start iscsid
modprobe iscsi_tcp
echo "iscsi_tcp" | sudo tee /etc/modules-load.d/iscsi_tcp.conf
K3s – a small Kubernetes version
Kubernetes can be installed with a single command. It can also automatically integrate Wireguard encryption between the nodes:
curl -sfL https://get.k3s.io | sh -s - server --cluster-init --flannel-backend=wireguard-native
After it has started, we need the IP and the token of this first node. The token can be retrieved using
cat /var/lib/rancher/k3s/server/node-token
Now we can start it on the other two nodes by running this command on node 2 and 3:
curl -sfL https://get.k3s.io | sh -s - server --server https://<your node1 IP>:6443 --flannel-backend=wireguard-native --token <your node1 token>
This way we have three nodes that can communicate with each other using an encrypted Wireguard connection.
Longhorn (Synchronized File System)
For different purposes we want to have the same files on all nodes. E.g. when a user uploads a file, it should be available on all three nodes. For this purpose we install Longhorn. Just run this on node 1, it will be installed on the others automatically:
curl -fsSL https://raw.githubusercontent.com/helm/helm/main/scripts/get-helm-3 | bash
helm repo add longhorn https://charts.longhorn.io
helm repo update
kubectl apply -f https://raw.githubusercontent.com/longhorn/longhorn/v1.5.1/deploy/longhorn.yaml
Traefik
K3s already contains Traefik, which can create Let’s encrypt certificates and route traffic to our webserver. When a certificate was created, it should be saved in a space where Longhorn can sync it with the other nodes, a persistent volume. First we need to create this persistent volume. Create a file traefik-pvc.yaml on node 1 with this content:
apiVersion: v1
kind: PersistentVolumeClaim
metadata:
  name: traefik
  namespace: kube-system
spec:
  accessModes:
    - ReadWriteOnce
  resources:
    requests:
      storage: 50Mi
  storageClassName: longhorn
Then run “kubectl apply -f traefik-pvc.yaml” to create this persistent volume.
Afterward we have to configure Traefik. Because it is already included in K3s, we have to edit the existing configuration using the command
kubectl edit deployment traefik -n kube-system
We have to make three changes:
args
In the “args” section we have to add some arguments to specify that we want to create Let’s encrypt certificates for our domains:
        - --certificatesresolvers.default.acme.httpchallenge=true
        - --certificatesresolvers.default.acme.httpchallenge.entrypoint=web
        - --certificatesresolvers.default.acme.email=<your email address>
        - --certificatesresolvers.default.acme.caserver=https://acme-v02.api.letsencrypt.org/directory
        - --certificatesresolvers.default.acme.storage=/data/acme.json
Then, above the “priorityClassName” section we insert a block that will set the file permissions of the acme.json in the persistent volume correctly so that Traefik can access it:
      initContainers:
      - command:
        - sh
        - -c
        - touch /data/acme.json; chmod -v 600 /data/acme.json
        image: busybox:latest
        imagePullPolicy: Always
        name: volume-permissions
        resources: {}
        securityContext:
          runAsGroup: 65532
          runAsNonRoot: true
          runAsUser: 65532
        terminationMessagePath: /dev/termination-log
        terminationMessagePolicy: File
        volumeMounts:
        - mountPath: /data
          name: data
      priorityClassName: system-cluster-critical
Then, in the existing “securityContext” section we add a “fsGroup” row to mount the persistent volume with a certain group id:
      securityContext:
        fsGroup: 65532
        runAsGroup: 65532
        runAsNonRoot: true
        runAsUser: 65532
And finally, in the “volumes” section we change the volume “data” to use our new persistent volume:
    volumes:
      - name: data
        persistentVolumeClaim:
          claimName: traefik
      - emptyDir: {}
        name: tmp
After saving these changes, Kubernetes should automatically restart Traefik. You can see all existing “pods” using
kubectl get pods -A
If you want to restart Traefik, you can do this by just deleting it:
kubectl delete pod <traefik pod name> -n kube-system
Container Registry
To be able to install own containers, e.g. our PHP webserver, we need a container registry, i.e. a service where our nodes can load container images from when they need to install a service. Installing it is quite simple. First we create a separate namespace:
kubectl create namespace registry
Then we create a file registry-all.yaml with its configuration. At the end you have to replace “registry.yourdomain.com” with your real domain for the registry. I.e. you have to create entries in your DNS with the name “registry.yourdomain.com” and the IPs of all three nodes (i.e. three A entries).
apiVersion: v1
kind: PersistentVolumeClaim
metadata:
  name: registry-pvc
  namespace: registry
spec:
  accessModes:
    - ReadWriteOnce
  storageClassName: longhorn
  resources:
    requests:
      storage: 10Gi
---
apiVersion: apps/v1
kind: Deployment
metadata:
  name: registry
  namespace: registry
spec:
  replicas: 1
  selector:
    matchLabels:
      app: registry
  template:
    metadata:
      labels:
        app: registry
    spec:
      containers:
      - name: registry
        image: registry:2
        ports:
        - containerPort: 5000
        volumeMounts:
        - name: registry-storage
          mountPath: /var/lib/registry
      volumes:
      - name: registry-storage
        persistentVolumeClaim:
          claimName: registry-pvc
---
apiVersion: v1
kind: Service
metadata:
  name: registry-service
  namespace: registry
spec:
  type: NodePort
  ports:
  - port: 5000
    targetPort: 5000
    nodePort: 30500  # Choose a port between 30000-32767
  selector:
    app: registry
---
apiVersion: networking.k8s.io/v1
kind: Ingress
metadata:
  name: registry-ingress
  namespace: registry
  annotations:
    kubernetes.io/ingress.class: traefik
    traefik.ingress.kubernetes.io/router.entrypoints: websecure
    traefik.ingress.kubernetes.io/router.tls: "true"
    traefik.ingress.kubernetes.io/router.tls.certresolver: default
    traefik.ingress.kubernetes.io/service.serverPort: "5000"
spec:
  tls:
  - hosts:
    - registry.yourdomain.com
  rules:
  - host: registry.yourdomain.com
    http:
      paths:
      - path: /
        pathType: Prefix
        backend:
          service:
            name: registry-service
            port:
              number: 5000
Then install it using
kubectl apply -f registry-all.yaml
That’s all. Now Traefik will create a Let’s encrypt certificate for it and you should be able to access it on https://registry.yourdomain.com . In the future you should add authentication to the registry. I will try to add documentation for it here.
Galera Cluster (Distributed MariaDB database)
Galera Cluster is a MariaDB (MySQL compatible) database where each node is a master, i.e. the nodes will sync with each other and you can do read and write operations on all of them. Thanks to an existing helm chart from Bitnami, it is easy to install. Just run this on node 1:
helm repo add bitnami https://charts.bitnami.com/bitnami
helm repo update
kubectl create namespace galera
Then create a file galera-values.yaml:
## galera-values.yaml

## Global Docker image parameters
##
image:
  registry: docker.io
  repository: bitnami/mariadb-galera
  tag: 10.11.4-debian-11-r0
  pullPolicy: IfNotPresent
  debug: false

## Kubernetes resource requests and limits
##
resources:
  requests:
    memory: 512Mi
    cpu: 250m
  limits:
    memory: 1024Mi
    cpu: 500m

## Persistence configuration
##
persistence:
  enabled: true
  storageClass: longhorn
  accessModes:
    - ReadWriteOnce
  size: 8Gi

## MariaDB configuration
##
auth:
  rootPassword: my-root-password
  replicationUser: repl_user
  replicationPassword: my-repl-password

## Service configuration
##
service:
  type: ClusterIP

## Number of replicas
##
replicaCount: 3

## Galera configuration
##
galera:
  clusterBootstrap: true
And run this afterward:
mkdir -p ~/.kube
sudo cp /etc/rancher/k3s/k3s.yaml ~/.kube/config
sudo chown $(id -u):$(id -g) ~/.kube/config

helm install my-galera bitnami/mariadb-galera \
  --namespace galera \
  --values galera-values.yaml
Now Galera should run on all three nodes. You can check it using
kubectl get pods -A -o wide
It will also use a Longhorn persistent volume to make re-syncing a new node faster, because then this node will already have the files of the previous failed node.
To get the automatically created root password for the database, you can use this command:
kubectl get secret --namespace galera my-galera-mariadb-galera -o jsonpath="{.data.mariadb-root-password}" | base64 --decode
To connect to the database and e.g. create databases and tables, you can use this:
kubectl exec -it my-galera-mariadb-galera-1 -n galera -- bash

mysql -u root -p
Now you can create an example database that we can use for our PHP example program later:
CREATE DATABASE myappdb;
CREATE USER 'myappuser'@'%' IDENTIFIED BY 'myapppassword';
GRANT ALL PRIVILEGES ON myappdb.* TO 'myappuser'@'%';
FLUSH PRIVILEGES;
EXIT;
PHP Webserver
Now we have everything to run our PHP webserver. Here is a simple example PHP project that we can deploy. Create a directory “php-app” and save a file index.php into it with this content:
<?php
$servername = getenv('DB_HOST');
$username = getenv('DB_USER');
$password = getenv('DB_PASSWORD');
$dbname = getenv('DB_NAME');

// Create connection
$conn = new mysqli($servername, $username, $password, $dbname);

// Check connection
if ($conn->connect_error) {
    die("Connection failed: " . $conn->connect_error);
}
echo "Connected successfully to Galera Cluster";

// Close connection
$conn->close();
?>
And create a Dockerfile in the same directory:
FROM php:8.1-apache
RUN docker-php-ext-install mysqli
COPY . /var/www/html/
RUN chown -R www-data:www-data /var/www/html
Now we have to create a container image from it and upload it to our container registry:
apt-get install docker docker.io
docker build -t registry.yourdomain.com/php-app:latest .
docker push registry.yourdomain.com/php-app:latest
Next we have to give the database credentials to our PHP script by creating a Kubernetes secret:
kubectl create secret generic galera-credentials \
  --from-literal=DB_HOST=my-galera-mariadb-galera.galera.svc.cluster.local \
  --from-literal=DB_USER=root \
  --from-literal=DB_PASSWORD=<your password> \
  --from-literal=DB_NAME=myappdb
Now it is time to set www.yourserver.com to the IPs of all three nodes (i.e. three A entries). Add it in your DNS server.
Then create a file php-all.yaml with this content and using that secret:
apiVersion: v1
kind: PersistentVolumeClaim
metadata:
  name: php-pvc
spec:
  accessModes:
    - ReadWriteOnce
  storageClassName: longhorn
  resources:
    requests:
      storage: 1Gi
---
apiVersion: apps/v1
kind: Deployment
metadata:
  name: php-deployment
spec:
  replicas: 1
  selector:
    matchLabels:
      app: php-app
  template:
    metadata:
      labels:
        app: php-app
    spec:
      containers:
      - name: php-container
        image: registry.yourdomain.com/php-app:latest
        ports:
        - containerPort: 80
        envFrom:
        - secretRef:
            name: galera-credentials
        volumeMounts:
        - name: php-storage
          mountPath: /var/www/html/uploads
      volumes:
      - name: php-storage
        persistentVolumeClaim:
          claimName: php-pvc
---
apiVersion: v1
kind: Service
metadata:
  name: php-service
spec:
  selector:
    app: php-app
  ports:
    - protocol: TCP
      port: 80
      targetPort: 80
---
apiVersion: networking.k8s.io/v1
kind: Ingress
metadata:
  name: php-ingress
  annotations:
    traefik.ingress.kubernetes.io/router.entrypoints: websecure
    traefik.ingress.kubernetes.io/router.tls: "true"
    traefik.ingress.kubernetes.io/router.tls.certresolver: default
spec:
  tls:
  - hosts:
    - www.yourdomain.com
  rules:
  - host: www.yourdomain.com
    http:
      paths:
      - path: /
        pathType: Prefix
        backend:
          service:
            name: php-service
            port:
              number: 80
and install it using
kubectl apply -f php-all.yaml
That’s all. Now you should have a working 3 node Kubernetes cluster that will continue to work even if one node fails. And when the node comes back it should automatically be re-integrated. You can access it using
$ curl https://www.yourdomain.com
Connected successfully to Galera Cluster