With iOS 9 the default UITableViewCell looks different on iPads now. It has a larger margin on the left and right side: This margin is used if the attribute cellLayoutMarginsFollowReadableWidth is set, which is turned on by default. That means by default your table view cells will now have this larger margin. However when creating UITableViewCells from … Continue reading “New iOS 9 attribute readableContentGuide”
With iOS 9 the default UITableViewCell looks different on iPads now. It has a larger margin on the left and right side:

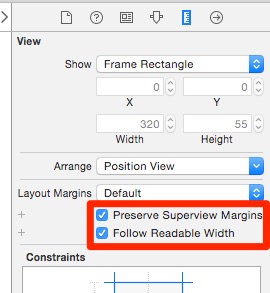
This margin is used if the attribute cellLayoutMarginsFollowReadableWidth is set, which is turned on by default. That means by default your table view cells will now have this larger margin. However when creating UITableViewCells from XIB files, you have to use Auto-Layout and you have to turn “Preserve Superview Margin” and “Follow Readable Width” on for the “Content View” of your UITableViewCell to make your custom cell use the same margins:
And when creating horizontal Auto-Layout constraints you have to ensure that “Constrain to margins” is checked:
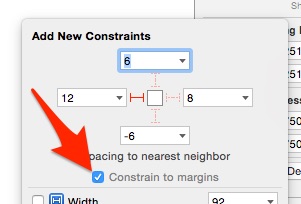
Otherwise your custom cells would have no margin and would not be correctly aligned with the other rows in the table.
iOS 11 and iPhone X
The same is now also necessary to display tables in landscape mode on the iPhone X. Because the iPhone X has a notch that is at the side of the screen in landscape mode and can overlap the text of the table cells if the readableContentGuide is not used.
E.g. to programmatically align “textLabel” correctly you could write this:
[self addConstraint:[textLabel.leadingAnchor constraintEqualToAnchor:self.readableContentGuide.leadingAnchor]];
[self addConstraint:[textLabel.trailingAnchor constraintEqualToAnchor:self.readableContentGuide.trailingAnchor]];
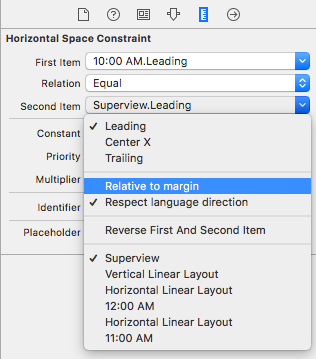
If you have tried the above and it still doesn’t work then click on the leading/trailing constraints one by one and ensure that the “Relative to margin” checkmark is set:
iPhone X and custom table headers
When using
- (UIView *)tableView:(UITableView *)tableView viewForHeaderInSection:(NSInteger)section
to set a custom header for your table view you have to return a normal view. If you use a XIB file you can just check “Follow Readable Width”. But if you are creating the view programmatically, you have to return a view that contains another view (like the contentView of a table cell) and that view then contains your content, e.g. “view(view(label))”. E.g. like this if “self” is the topmost view:
UIView *pane = [[[UIView alloc] init] autorelease];
pane.translatesAutoresizingMaskIntoConstraints = FALSE;
[self addSubview:pane];

[self addConstraints:[NSLayoutConstraint constraintsWithVisualFormat:@"V:|-[pane]-|" options:0 metrics:nil views:NSDictionaryOfVariableBindings(pane)]];
UILayoutGuide *guide = self.readableContentGuide;
[guide.leadingAnchor constraintEqualToAnchor:pane.leadingAnchor].active = TRUE;
[guide.trailingAnchor constraintEqualToAnchor:pane.trailingAnchor].active = TRUE;

[pane addSubview:textLabel];

self.textLabel = [[[UILabel alloc] init] autorelease];
textLabel.translatesAutoresizingMaskIntoConstraints = FALSE;
[pane addConstraints:[NSLayoutConstraint constraintsWithVisualFormat:@"H:|-[textLabel]-|" options:0 metrics:nil views:NSDictionaryOfVariableBindings(textLabel)]];
[pane addConstraints:[NSLayoutConstraint constraintsWithVisualFormat:@"V:|[textLabel]|" options:0 metrics:nil views:NSDictionaryOfVariableBindings(textLabel)]];